Introduction to Llama3
Llama 3 is a line of open-source models released by Meta. The latest version of which is Llama 3.2. This is the first multimodal models in the series. The Llama3 11B and 90B parameter multimodal LLMs can now process and understand both text and images!
This tutorial will guide you through the process of self-hosting Llama3.2 Vision as a private API endpoint. We will be using OpenLLM.
Where to download it from
LLaMA 3 can be downloaded for free from Meta’s website and pulled in from hugging-face. It is offered in two variants: pre-trained, which is a basic model for next token prediction, and instruction-tuned, which is fine-tuned to adhere to user commands. It can be downloaded for free from Meta's website. [2] .
You can also get LLaMA-3 from hugging-face, which is what we are going to do. In order to do that , go to the Llama-3.2-11B-Vision model page on HuggingFace. Apply for access by agreeing to the license terms. Once approved, generate a read token from your HuggingFace account.
Llama3.2 11B Vision Instance Requirements
In order to deploy any model, we first need to determine the compute requirements. As a basic rule of thumb, the size of the parameter is the space it needs on the disk. However, in order to load it in memory, there is usually an overhead, so roughly a 1.5x-4x the size it takes on the disk. [4]
Since LLaMA3.2-11B has 11 billion params. It roughly requires 22GB storage, and around 30GB RAM. Now the RAM could be GPU or a CPU, with the GPU resulting in faster inference. We are going to use the GPU.
Which instance to choose on AWS
Ok so we need roughly 30GB of RAM and 22 GB of disk space for LLaMA-3-11B. We want to go for instances that are optimized for compute with a single GPU, preferably one with the latest version. For the purpose of this tutorial, we will go with the g5.2xlarge. Its has Nvidia A10 GPU, which gives better performance than the T-4 instances, and cheaper than the ones with the A100 GPUs. [5]
Cost and Pricing
All EC2 instances have on-demand pricing, unless they are reserved. This means that you are charged for the amount of time it's running. You will not be charged if you stop the instance. The price for a g5.2xlarge in US-east-1 is roughly 1.2$/hr. This amounts to a total of 864$ per month, if its always on. You will save money if the server spins down after inactivity. You can attach certain triggers to handle that but it is beyond the scope of this article. [6]
Launching the Instance
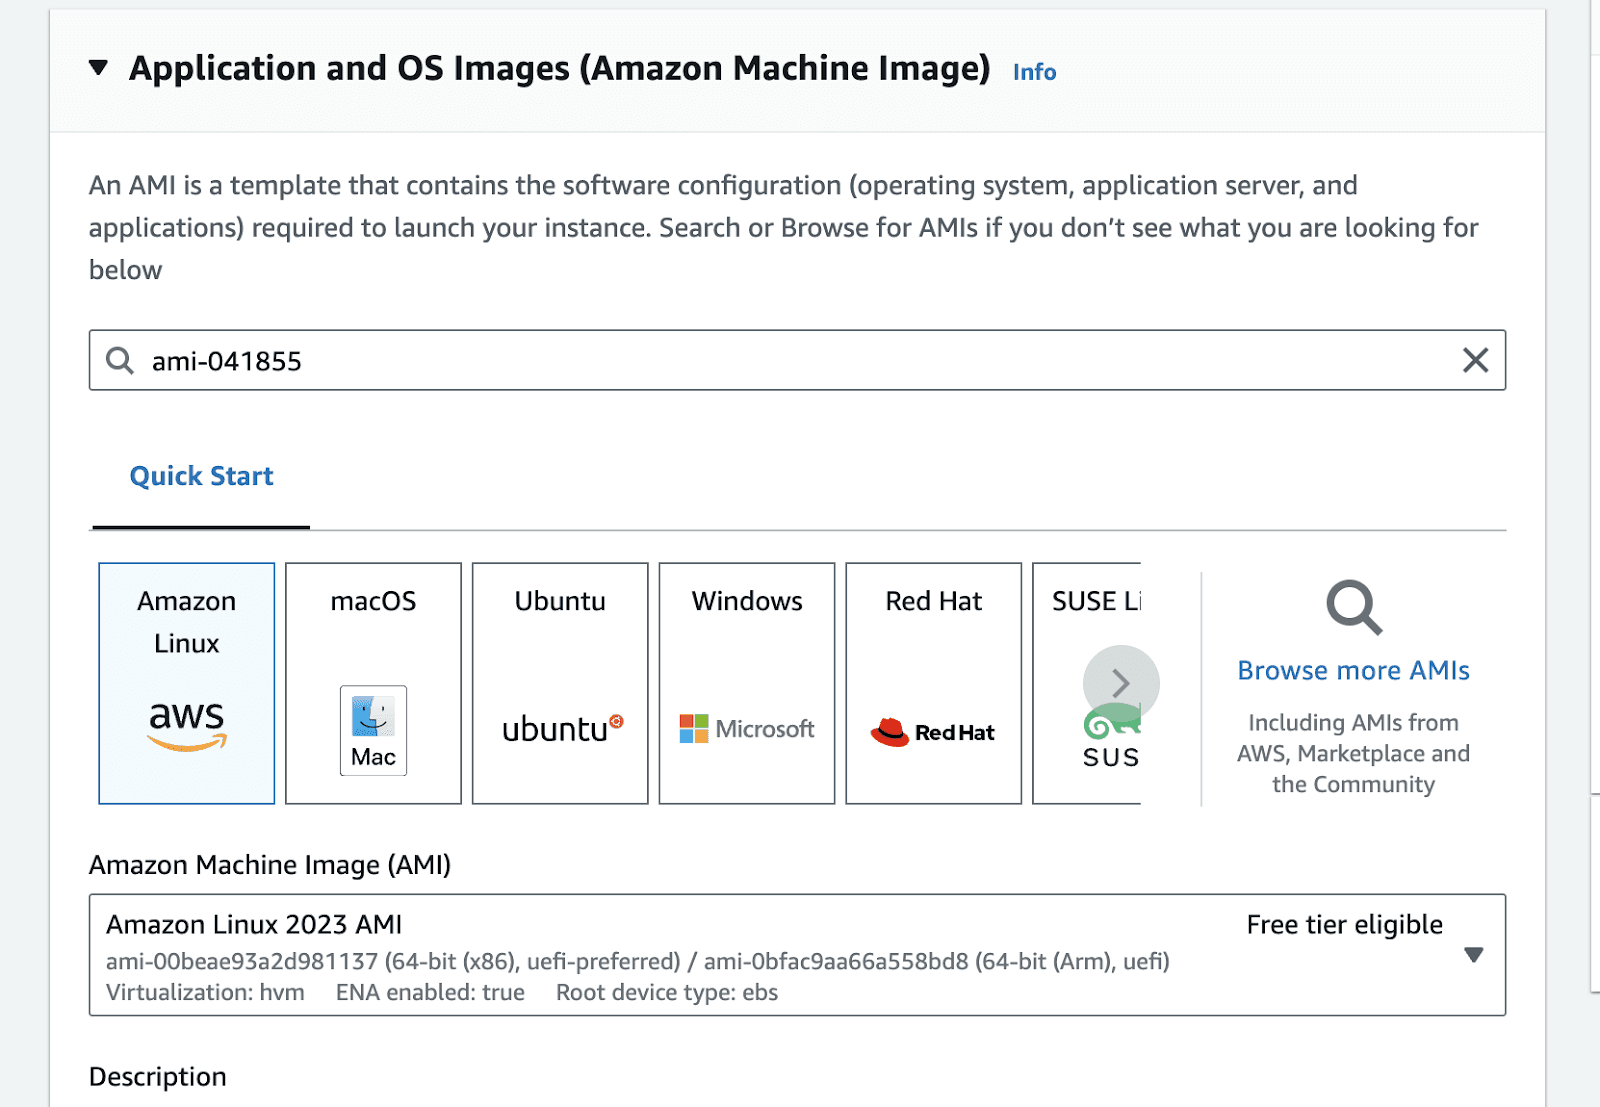
Go to the launch instance portal in the relevant zone. In the application and OS images section type ami-041855, click enter. This is the id of the base image we will use to spin up our instance.
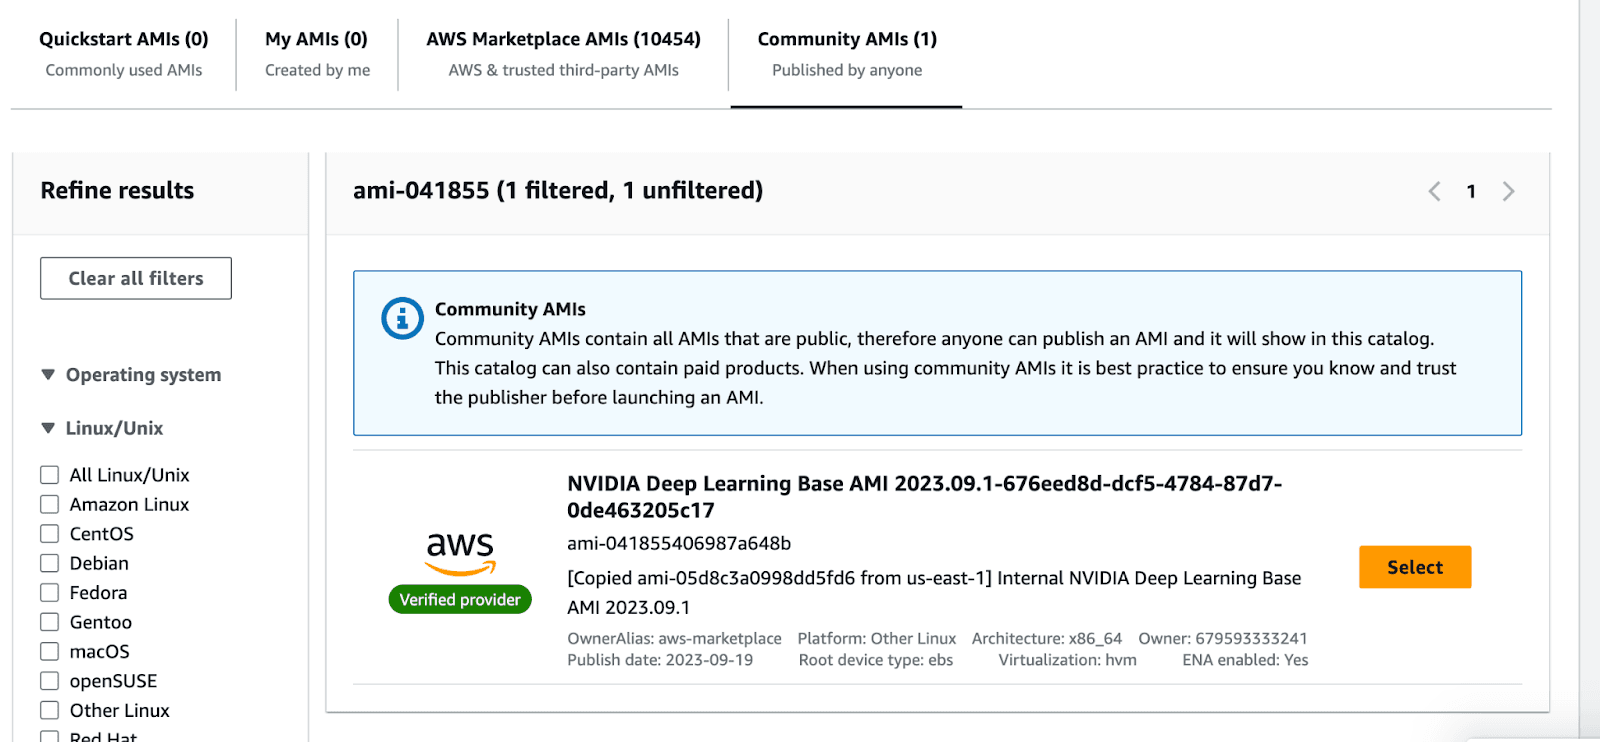
This will take you to the AMI search portal. Go to the Community AMIs tab , and select the Nvidia Deep Learning Base AMI.
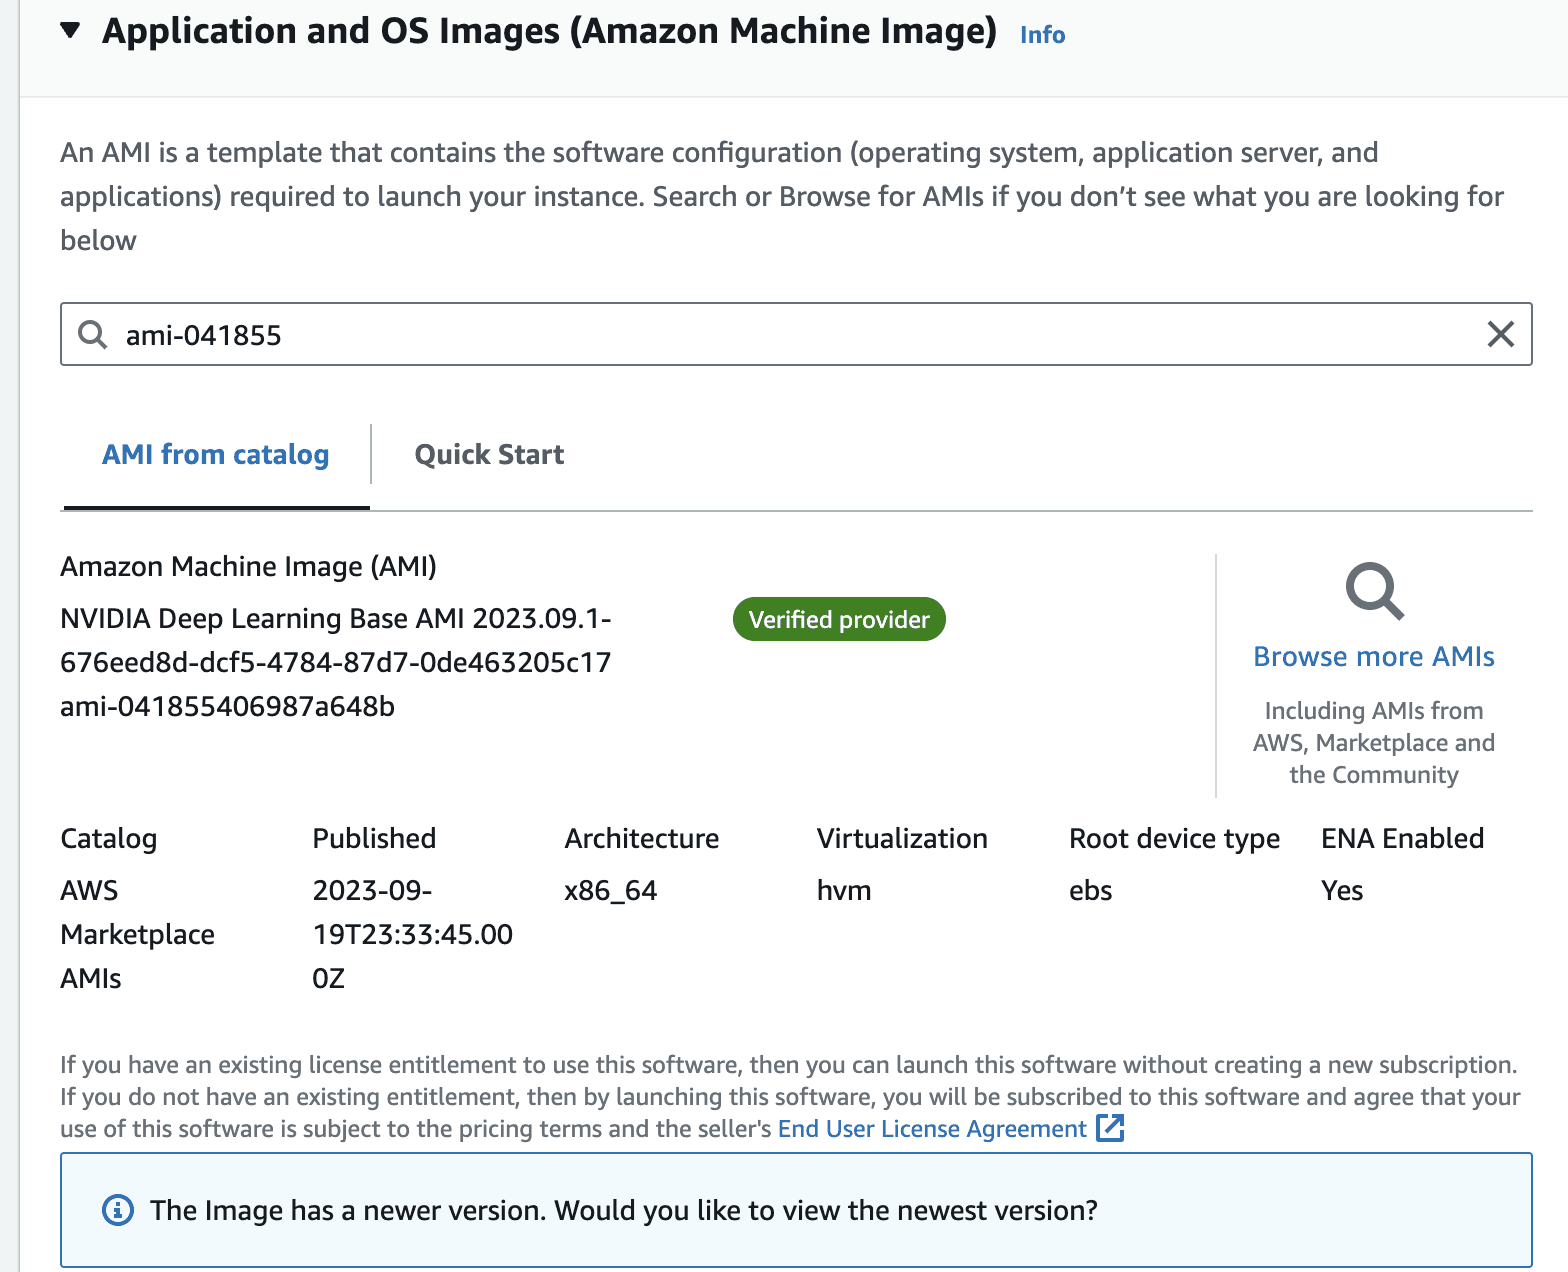
Once you select the image, the view should look like the following.
In the instance type, panel, select g5.2xlarge from the dropdown
Make sure you attach a key-pair to the instance.

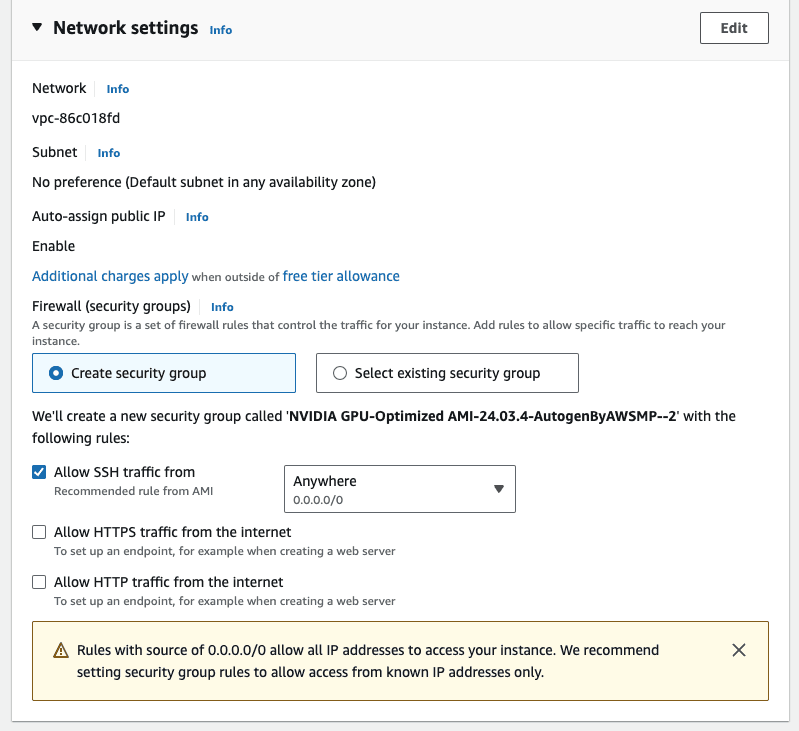
Leave the default network settings, i.e. only allow ssh Traffic for now. We will modify this in a bit.
In the configure storage, attach an external volume. Attach an extra storage of 128GB, this is mostly if you want to persist some data between reboots. The default storage on the instance is ephemeral, which means that data can get lost if the instance is restarted.
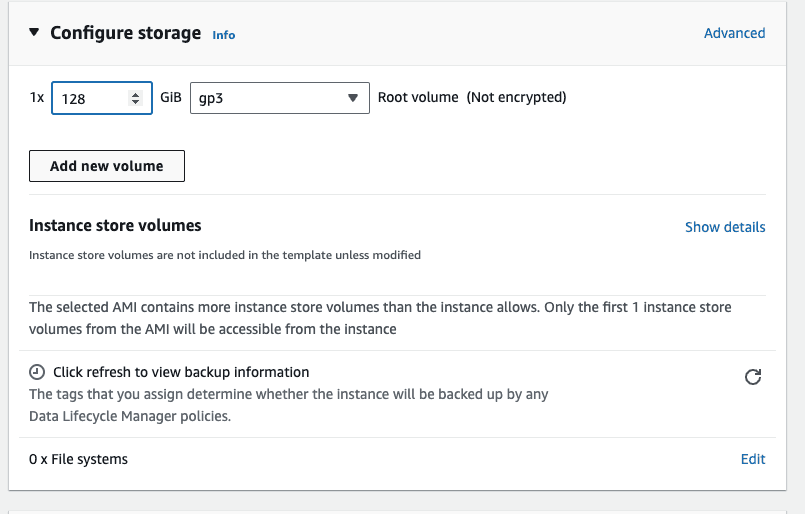
Confirm the summary, and click on launch instance
Once the instance is running, modify the security group to allow incoming requests at port 8000. This is because our inference server will be running on port 8000.
Preparing the instance
We are going to use OpenLLM to serve the language model on our server.
Once the instance is running. Establish an SSH connection to the instance from your terminal. You can do that by using the following command.
Once inside the instance, create a virtual env, and install openllm with the following command. This will take a few minutes
Launch the Inference Server
Make sure you have logged into the hugging-face portal and applied for the license. You can do that by going to the relevant model page and applying there. In our case the model that we are interested in is meta-llama/Llama-3.2-11B-Vision-Instruct. Once you are approved, make sure to run the following in the terminal, to configure your hugging-face API key.
You can simply run an OpenAI compatible inference server by running the following command. The name of the model comes from the relevant hugging-face name [7]. This takes a few mins to run the server fully
Once the server is running, you will see something like the following
This means that our server is running on port 8000, and you can call it from your computer by running the following python script.
Example output from the Llama3.2 Vision model:
Choice(finish_reason='stop', index=0, logprobs=None, message=ChatCompletionMessage(content='The image shows a traditional Japanese lunchbox, called a bento, which is a self-contained meal typically served in a wooden or plastic box. The bento in the image consists of various small dishes arranged in separate compartments, including rice, miso soup, and other side dishes such as vegetables, fish, and meat. The bento is placed on a tray with chopsticks and a small bowl of soup. The overall presentation of the bento suggests that it is a carefully prepared and visually appealing meal, likely intended for a special occasion or as a gift.', refusal=None, role='assistant', function_call=None, tool_calls=[]), stop_reason=None)
You now have a production ready inference server that can handle many parallel requests. However, it can only serve so much, if the number of requests increases, then you might have to think about horizontal scaling i.e. spinning up other instances and load balancing the requests among them. Similarly, make sure you also think about attaching a spin-down policy to the instance, otherwise the monthly bill can get pretty expensive. If you don’t want to do all of that yourself, you can check out SlashML, which handles all of these things for you.
Conclusion
Deploying Llama 3.2 Vision with OpenLLM in your own VPC provides a powerful and easy-to-manage solution for working with open-source multimodal LLMs. By following this guide, you've learned how to set up, deploy, and interact with a private deployment of Llama 3.2 Vision model, opening up a world of possibilities for multimodal AI applications.
If you have questions about LLaMA 3 and AI deployment in general, please don't hesitate to ask us, it's always a pleasure to help! just email support@slashml.com
Checkout our awesome apps ⬇️⬇️⬇️
If you want to chat with data and generate visualizations, please visit SirPlotsAlot
If you want to chat with Any github Codebase, please visit CodesALot
Build AI enbaled apps from a single prompt
Build full stack Apps from prompts
READ OTHER POSTS


